Before getting started
Read this overview article which explains how this feature works
The file upload into RevMan works with the study centric data management feature in RevMan. You can use the practice review in RevMan to test the file import.
Note:
Covidence can only export to RevMan from reviews using extraction 1 and using dual-reviewer extraction
Exporting data to RevMan
Covidence produces a RIS file and 4 CSVs to import into RevMan. If you are using Risk of bias 2, you can screen studies and extract data in Covidence, and conduct your Risk of bias assessment in the Cochrane tool. You will have 3 CSVs to import from Covidence. Import your Risk of bias data separately once the study data import is complete. If you are using Risk of bias 1, you can conduct your Risk of bias assessment in Covidence and import to RevMan with your study data. You will have 4 CSVs to import from Covidence. The following steps outline how to ensure the data in the CSVs can be successfully uploaded into RevMan.
1. Download references in the "Cochrane RevMan" RIS file from Covidence
a. Upload reference data. If you want to upload the reference data for included studies, upload the RIS file before importing the CSVs (and this needs to be done before you import the CSVs into RevMan). If you import them afterwards then you’ll get duplicate studies in RevMan. On the Export page, you can select Export to file > References > Stage > Included > Format and then select 'Cochrane RevMan' option. This will produce a .ris file that you will be able to import to your included studies section in RevMan as described here.
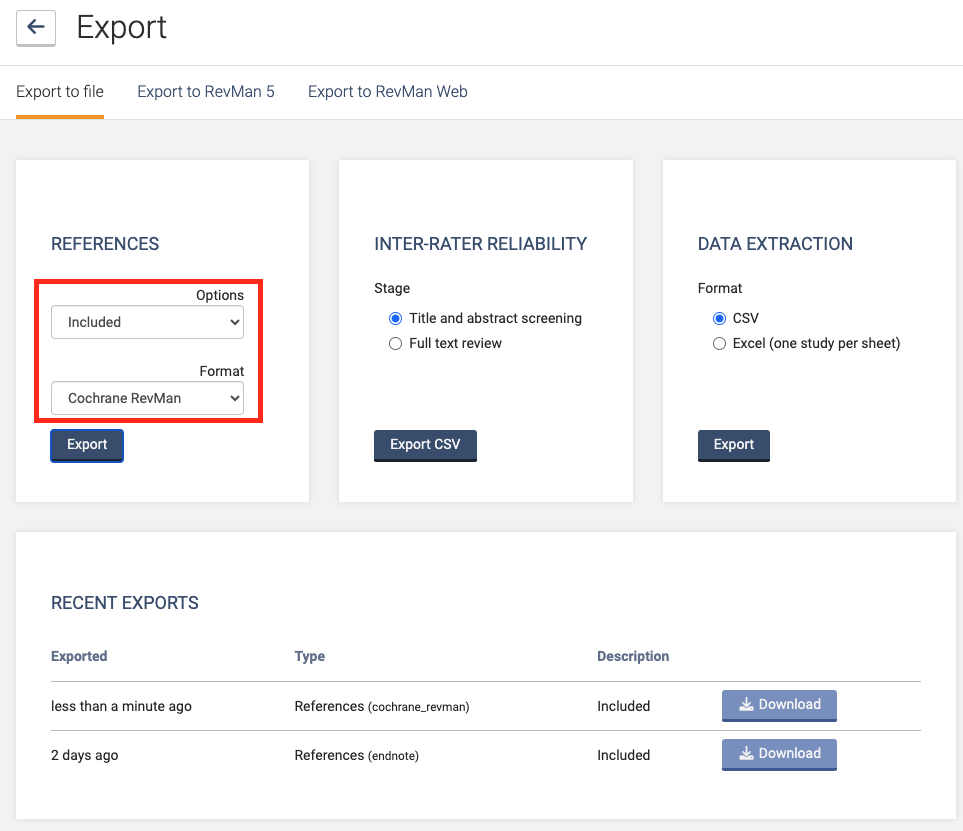
b. To import excluded studies into RevMan, you need to export the list of excluded studies from Covidence using a RIS format option. On the Export page, you can select Export to file > References > Stage > Excluded > Format and then select 'Cochrane RevMan' option. This will produce a .ris file that you will be able to import to your excluded studies section in RevMan as described here. Please note that exclusion reasons will be included when exporting through this pathway.
2. Download the 4 CSVs from Covidence
a. Click “Export” on the review summary page and then click on the “Export to RevMan Web” tab.
b. Click on the “Export RevMan Web file” button to download the 4 CSVs: Study information, Study arms, Study results, Risk of bias.
c. If “Study custom results” is also exported this means that some data will need to be manually added into RevMan Web.
If you would like to practice this process with four sample csv files, click here to download them. And click here to create a practice review in RevMan.
3. Follow the steps to prepare your data for import
These are described in the Cochrane knowledge base. The steps include:
a. Add the ‘Identification’ field to study characteristics tables in RevMan
b. Check intervention names captured in Covidence match those defined in RevMan.
c. Check outcome names captured in Covidence match those defined in RevMan.
d. (Optional) Add any covariates to the CSV before uploading.
e. Check that the risk of bias domains and outcome groups captured in Covidence match those in RevMan.
4. Import data to RevMan
The process for importing data to RevMan is described in the Cochrane knowledge base.
More information
For more information about importing data to RevMan, read this article. You can also watch this video.
For a detailed walkthrough on how to export to RevMan, you can view this video.